How to Make Yokai's Mask From Big Hero 6 by Kumaaa from instructables
- By Sai
- 3220 views
Step 1: Materials


 5 More Images
Luckily, I didn't have to go out to get anything since I could just use the materials that I already have around the house. So this project is relatively inexpensive depending on what materials/tools you already have, but you can be creative and substitute several of the items I've used.
Materials
- Mannequin head or any human-shaped sized object
- Plasticine
- White glue
- Water
- Paper
- Plasticine
- Saran wrap
- Lightweight wall putty
- Acrylic and spray paints
- Craft foam
- Masking tape
- Sharpie
- Polarized sunglasses lens
- Sponges
Tools:
- Human hands and/or fingers
- Hobby knife
- Scissors
- Sculpting tools
- Sandpaper
- Glue gun
- Dust mask
Add TipAsk QuestionCommentDownload
Step 2: Sculpting


 3 More Images
First I used a face mannequin that I've made a while back as a base for my clay sculpture which I then covered with saran wrap and taped down the edges with masking tape. I used plasticine as my clay medium and built up the features of my mask by using several reference images. I can't really describe how to sculpt clay, so I highly recommend you search up some clay sculpting videos to save you the hassle of being unsatisfied with your sculpt. Once I got to the final shape that I was satisfied with, I smoothed the surface of the plasticine with my fingers and began my clay sculpt for the next step.
Add TipAsk QuestionCommentDownload
Step 3: Applying the Paper Mache


I've completely forgotten to take any pictures during this step, so I will be using pictures from another project that uses the same method as this tutorial.
Before I applied the first layer of paper mache, I covered every detail and crevasse of my clay model with saran wrap so that it will be easier to remove the paper mache copy later on. The paper mache paste that I used was a simple 1:1 volume ratio of water and white glue, but really the ratio doesn't really matter as long as the glue wasn't as thick as it originally was. Then I dipped the strips of paper into the glue and applied it to my clay base.
Add TipAsk QuestionCommentDownload
Step 4: Removal and Trimming


Removal
After about 4-6 layers of paper mache, I removed the paper mache copy from the clay mold by gently prying the sides of the mask away until the glue tear itself away from the saran wrap layer. I also could've made another mask by reusing my clay mold but I chose not to because I wanted to see how well this mask making method would work. The reason why I used only about 4-6 layers of paper mache was that I wanted that I only needed to get the basic shape while being sturdy and flexible enough to be removed from its clay mold more easily.
*Tip: Don't apply too many layers of paper mache on your clay base or else it will be much harder to remove!*
Trimming
This step wasn't really necessary but I wanted to make sure that the sides of my mask were as symmetrical as possible. I used a hobby knife and scissors to trim any excess paper mache off, especially around the eyes. To make the opening of the nostrils on my mask, I stabbed my knife into the nostril area to create a small opening where I then inserted a pen to widen it.
Strengthening
Since I planned on adding wall putty (next step) on my mask to smooth it out, I needed my mask to be rigid enough so that the wall putty layer will not crack if the mask was bent. So I applied about 5-6 more layers of paper mache until it can keep its shape if a force was applied to its sides.
While my mask was drying, it was much more malleable since the water caused the initial layers of paper mache to soften but this meant that my mask would lose the shape I want it to be in. I placed my mask in between 2 dumbells until it was dry enough to keep its shape without any support. (I don't have a picture of this step, but I'll use another mask I've made as an example of this)
Add TipAsk QuestionCommentDownload
Step 5: Smoothing and Sanding


 2 More Images
I used lightweight wall putty for this step, but I believe that wood filler is a better substitute since it's easier to apply and has a harder texture once it's dried.
Smoothing
The wall putty that I found in my garage had a pretty foamy texture and is lighter than the regular wall putty, which I think is a reason why it was tricky to apply smoothly but was. So I added some water to the water to the wall putty and that somewhat helped make the putty easier to apply.
Sanding
I started with a 220 grit sandpaper and gradually moved onto 220, 320, 400, 800, and then 1000 grit sandpaper. To be honest, anything higher than 400 grit sandpaper is pretty redundant, unless you want your mask to be smoother than a baby's butt.
Add TipAsk QuestionCommentDownload
Step 6: Painting and Pattern


 5 More Images
Painting is pretty straightforward since I just painted my mask with a white acrylic base coat. Then I lightly drew the patterns onto the mask and masked the edges for a "cleaner" paint job. I repeated this process for the eyebrows by using black paint and the other details with red paint where I then removed the masking tape around the edges. I finished the paint job by cleaning and filling the edges of the patterns with a red and black ultra-thin Sharpie.
Add TipAsk QuestionCommentDownload
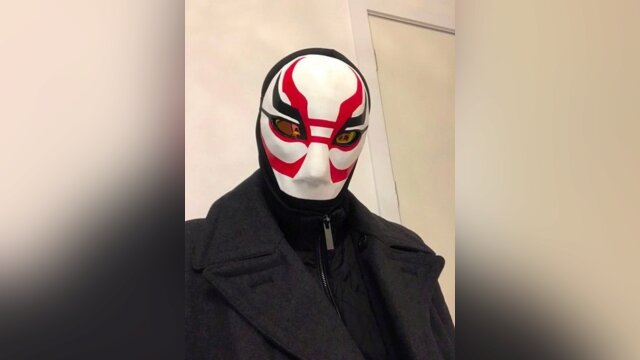
Step 7: DONE


 3 More Images
Topcoat
Before I installed the straps, lens, and cushions inside the mask, I used Krylon's Crystal Clear to give my mask a clean and shiny finish. However I kind of rushed this part because it did not apply as smooth as I wanted it to be. So yea, take your time and wait for a few minutes between each coat.
Extras
For the lens, I simply got a pair of cheap polarized sunglasses from the dollar store and popped the lens out of the frame. Then glued 4 strips of craft foam around the eyes of my mask. To make my mask more comfortable to wear, I cut out 3 small pieces from a car sponge and glued it the interior areas where it would make contact with my face. Finally, I hot glued the elastic band to my mask because how would you wear a mask without a strap to attach it to your noggin?
Congratulations and thank you for reading this! You've made it this far without throwing up at the number of words this tutorial has!